Using Tables in Authoring Studio: Adding, Editing, and Formatting
Inserting a table to your document is a key feature. A table can help keep your
content organized and clear.
How to Insert a Table
1. Find and click the Table icon in the toolbar.2. When you click the table icon, a basic table shows up. Move your mouse over it to pick how many rows and columns you want. The area you choose will turn blue.3. Click to make a table in your document with the size you picked.
Table Settings Menu
Adjusting your table is easy.
Just click inside the table where you want to make changes. This will show the
table settings menu at the top of the table.
Font Settings
Select your text and click on the
corresponding button to make it Bold, Italic, or Underlined.
You can also adjust the Font,
Size and Color of your selected text within the table.
Delete Border
Click on your table, and in the
Table Settings menu, click on Delete Border to remove
borders.
Merge Cells
Select the cells you want to join
and click Merge Cells in the settings
menu.
Split Cells
Click on a cell and choose Split
Cells from the menu to divide it.
Delete Table
Click on the table and select Delete
Table from the menu to remove the whole table.
Table Caption
Click this to add a title to your
table, which looks different from regular text.
Reset Table Sizing
Choose this to make the cells go
back to their original size.
Color
Pick a cell or cells and choose a
color from the menu to change their color.
Distribute Size
Normally, adding text to a cell
makes it wider. Distribute Sizes auto-changes
the cells back to their original size, and the text will wrap to fit.
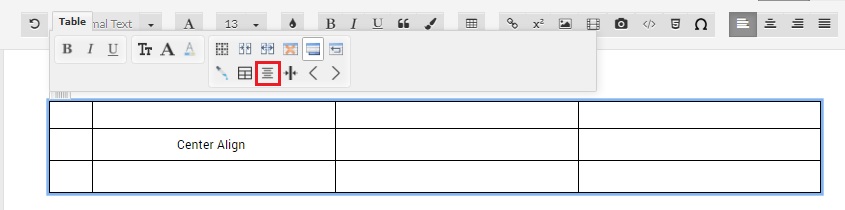
Center Align
Click the cell, then select Center Align to perfectly center-align the text within.
Vertical Text
Click a cell and select Vertical
Text to make the text go up and down instead of across.
Selecting a Row and Column
Move your mouse over the first
row or column to select a whole row or column. If you click outside the table,
these options disappear. By selecting a row or column, you can see the Table
Row/Column Menu.
Table Row Menu
To edit a row in a
table, choose the row you want to change. The table row editing menu will
appear on top of the table.
Font Settings in a Row
Use the font settings
in the row menu to change the style (bold, italic, underline), size, font type,
and color.
Adding a Row
1. Pick the row where you want to add a new row.2. In the row menu, select Add Row Before to add a row above or Add Row After to add one below.
Deleting a Row
Choose the rows and
click Delete Rows to remove them.
Format the Row as a Table Header
This makes the text in
the row bold, like headers.
Merging Cells within a Row
Select the cells and
click Merge Cells to combine them into one.
Splitting Cells within a Row
Choose the cell and
click Split Cells to divide it into more cells.
Coloring Cells within a Row
Select the row and
choose a color to change the color of the cells.
Table Column Menu
To edit a column in a
table, choose the column you want to change. The table column editing menu will
appear on top of the table.
Font Settings in a Column
Use the font settings
in the column menu to change the style (bold, italic, underline), size, font
type, and color.
Adding a Column
1. Pick the column where you want to add a new one.2. In the column menu, select Add Column Before to add one to the left or Add Column After to add one to the right.
Deleting a Column
Choose the column and
click Delete Column to remove it.
Format the Column as a Table Header
This makes the text in
the column bold, like headers.
Merging Cells within a Column
Select the cells and
click Merge Cells to combine them.
Splitting Cells within a Column
Choose the cell and
click Split Cells to divide it.
Coloring Cells within a Column
Select the cells and
choose a color to change their color.
Related Articles
Quick Guide to The Authoring Studio's Chapter Editor
Welcome to the Chapter Editor, a powerful tool that makes writing and editing easier. Here's a quick overview of its main features to help you get started. Insert Menu This tool lets you add various elements and styles to your chapter, like ...Easily Inserting and Editing Formulas in Authoring Studio
Formulas are an essential element in many documents, particularly educational materials, scientific publications, or technical documents. Whether you need to include mathematical equations or complex expressions, the Authoring Studio makes inserting ...Text Formatting in Authoring Studio
Text formatting is key to making content clear and engaging. It includes styles like normal text and headings and tools to make text stand out, like font choices, sizes, and colors. Styles Text Styles: These are different ways to format text, like ...Using Endnotes in Authoring Studio
An endnote is a note at the end of a chapter or document. It gives extra information, citations, or context about something mentioned in the text. In Studio's Chapter Editor, you can easily add endnotes to your chapter using Insert Endnote. When ...Adding a Chapter in Authoring Studio
Follow these steps to add a new chapter to your content: 1. On the Table of Contents page, locate the New Chapter button at the top right corner. 2. Click on the New Chapter button to open the Create New Chapter modal. 3. Inside the modal, assign a ...